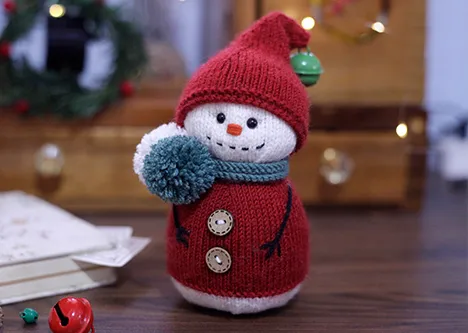
Are you looking for a fun and festive project to knit for Christmas? Do you love snowmen and want to make your own adorable ones? If so, you will love this Free snowman knitting pattern that I have designed for Christmas!
My PDF knitting pattern is written in English, the file is 10 pages PDF. The pattern includes all the necessary information, clear instructions, and 51 step-by-step figures to guide you through each step.
You can also watch a tutorial video on my website [Cheryx.com] to see how I made this snowman. It’s very easy to follow and suitable for beginners. You can make the hat and scarf in any color you like.
You can also customize your snowman by adding some accessories, such as a broom or a carrot.
The finished snowman is about 14 inches tall. It is soft and cuddly and perfect for decorating your home or giving as a gift. You can make one or more snowmen and create a whole family of them!
I hope you enjoy knitting this snowman and have a wonderful holiday season!
MATERIALS
A pair of 2.5mm straight knitting needles
- Yarn: Susan Family 4 - white 64, red 29, green 41
- Toy filling (less than 50g)
- A pair of 5 mm black safety eyes
- Two 1,5cm diameter buttons
- Sewing needle
- Scissors
- Sewing pins
- A bell with 2 cm diameter
SIZE
The finished toy is 14cm tall
ABBREVIATIONS
K: Knit
P: Purl
KFB: (Increase) Knit front and back of stitch
KLL: (Increase) After working a knit stitch, identify the stitch 2 rows below the one on your right needle.With your left needle, come from behind to scoop up the left loop of this stitch. This loop on the left needle is the new stitch. Insert the right needle tip through the back loop and knit.
K2tog: (Decrease) Knit two stitches together
P2tog (Decrease) Purl two stitches together
Stocking Stich (St st): Knit all stitches on right side rows, purl all stitches on wrong side rows.
st(s): Stich(es)
(...sts): The number in round brackets at the end of the instruction indicates the number of stitches after working the row.
KNITTING PATTERN
Head and body (Knit 1)
Leave a long tail for sewing, cast on 8 stitches with white yarn.
Row 1: K1, KFB x6, K1 (14 sts)
Row 2: P
Row 3: K1, (K2, KLL) x6, K1 (20 sts)
Row 4: P
Row 5: K1, (K3, KLL) x6, K1 (26 sts)
Row 6: P
Row 7: K1, (K4, KLL) x6, K1 (32 sts)
Row 8: P
Row 9: K1, (K5, KLL) x6, K1 (38 sts)
Row 10: P
Row 11: K1, (K6, KLL) x6, K1 (44 sts)
Row 12: P
Row 13: K1, (K7, KLL) x6, K1 (50 sts)
Row 14 – Row 20: St st (Knit “K” all stitches on right side rows, “P” all stitches on wrong side rows)
Using 2 ends of different color yarn to mark (I've used red yarn to illustrate ). Where 2 ends of the red yarn come out, we will sew the eyes to the head later.
Row 21: K22, place marker by one end of the red yarn (Fig. 1), K6, place marker by the other end of yarn (Fig. 2), K22 (Fig. 3) (50 sts)


Row 22 – Row 28: St st
Row 29: K1, (K4, K2tog) x8, K1 (42 sts)
Row 30: P
Row 31: k1, (K3, K2tog) x8, K1 (34 sts)
Row 32: P
Row 33: K1, (K2, K2tog) x8, K1 (26 sts)
Row 34: P Cut off the white yarn, continue knitting with red yarn.
Row 35: K1, (K4, KLL) x6, K1 (32 sts)
Row 36: K (It’s wrong side row, but knit “K”)
Row 37: K1, (K5, KLL) x6, K1 (38 sts)
Row 38: P
Row 39: K1, (K6, KLL) x6, K1 (44 sts)
Row 40: P
Row 41: K1, (K7, KLL) x6, K1 (50 sts)
Row 42: P
Row 43: K1, (K8, KLL) x6, K1 (56 sts)
Row 44: P
Row 45: K1, (K9, KLL) x6, K1 (62 sts)
Row 46 :P
Row 47: K1, (K10, KLL) x6, K1 (68 sts)
Row 48 – Row 67: St st
Row 68: K (It’s wrong side row, but knit “K”)
Cut off the red yarn, continue knitting with white yarn.
Row 69: K (68 sts)
Row 70 – Row 78: St st (68 sts)
Row 79: K1, (K9, K2tog) x6, K1 (62 sts)
Row 80: P1, (P8, P2tog) x6, P1 (56 sts)
Row 81: K1, (K7, K2tog) x6, K1 (50 sts)
Row 82: P1, (P6, P2tog) x6, P1 (44 sts)
Row 83: K1, (K5, K2tog) x6, K1 (38 sts)
Row 84: P1, (P4, P2tog) x6, P1 (32 sts)
Row 85: K1, (K3, K2tog) x6, K1 (26 sts)
Row 86: P1, (P2, P2tog) x6, P1 (20 sts)
Row 87: K1, (K1, K2tog) x6, K1 (14 sts)
Row 88: P2tog x7 (7 sts)
Leave a long tail for sewing, then cut off the yarn. Thread this tail through remaining stitches and pull up tightly.
Scarf (Knit 1)
Leave a long tail, cast on 42 stitches with green yarn.
Row 1: P (42 sts)
Row 2: P
Row 3: K (42 sts)
Row 4: P
Row 5: Cast off
Leave a long tail , then cut yarn.
Hat (Knit 1)
Leave a long tail, cast on 62 stitches with red yarn.
Row 1: P (62 sts)
Row 2: K
Row 3: K (62 sts)
Row 4: K
Row 5 – Row 18: St st (Knit “K” for odd rows, knit “P” for even rows)
Row 19: K1, (K8, K2tog) x6, K1 (56 sts)
Row 20 – Row 22: St st
Row 23: K1, (K7, K2tog) x6, K1 (50 sts)
Row 24 – Row 26: St st
Row 27: K1, (K6, K2tog) x6, K1 (44 sts)
Row 28 – Row 30: St st
Row 31: K1, (K5, K2tog) x6, K1 (38 sts)
Row 32 – Row 34: St st
Row 35: K1, (K4, K2tog) x6, K1 (32 sts)
Row 36 – Row 38: St st
Row 39: K1, (K3, K2tog) x6, K1 (26 sts)
Row 40 – Row 42: St st
Row 43: K1, (K2, K2tog) x6, K1 (20 sts)
Row 44 – Row 46: St st
Row 47: K1, (K1, K2tog) x6, K1 (14 sts)
Row 48 – Row 50: St st
Row 51: K2tog x 7 (7 sts)
Leave a long tail for sewing, then cut off the yarn. Thread this tail through remaining stitches and pull up tightly.
SEWING & MAKING UP
We will sew and making up the snowman as show in this video (Using Mattress Stitch to sew)
If you enjoyed this video and found it helpful, give it a thumbs up and subscribe to my channel for more knitting tutorials. And don't forget to share your photos of your finished dolls with me on Instagram using the hashtag #Cheryx.Knitadream. I can't wait to see your creations!
------------------------------------------------------------
Merry Christmas with little snowman!

✿ If you love my free patterns,tips and tutorial videos and you would like to support , you can Buy Me A Coffee. I really appreciate your support, it's my motive and I will try to do more. Thank you so much!


